


Spring Cloud 对比 Dubbo
SpringCloud
- 基于
HTTP协议 - 一个框架集
- 提供了一整套微服务解决方案(全家桶)
Dubbo
- 基于
RPC协议 - Dubbo只是一个远程调用(RPC)框架
- 默认基于长连接,支持多种序列化格式
Spring Cloud 技术组成
- eureka
微服务治理、注册与发现 - ribbon
负载均衡、请求重试 - hystrix
断路器: 服务降级、熔断 - feign
ribbon + hystrix 集成,并提供声明式客户端 - hystrix dashboard 和 turbine
hystrix 微服务监控 - zuul
API 网关,提供微服务的统一入口,并提供统一的权限验证 - config
配置中心 - bus
消息总线,配置刷新 - sleuth+zipkin
链路跟踪
Eureka
- eureka基本特性:
l 服务启动时,连接 eureka 服务器,把自己的地址向其他 eureka 注册
l 如果注册失败,等30秒再重新注册,直到注册成功
l 微服务每30秒重新从eureka拉取注册表
l 微服务每30秒向 eureka服务器 发送一次心跳数据
l eureka连续三次收不到心跳数据,会认为微服务挂了
l 一个服务不可用时,eureka会进入保护模式,不删除该服务的注册信息 - eureka 自我保护模式: 心跳失败的比例,
在15分钟内微服务心跳是否低于85%,如果出现了低于的情况,Eureka Server会将当前的实例注册信息保护起来,同时提示一个警告,一旦进入保护模式,Eureka Server将会尝试保护其服务注册表中的信息,不再删除服务注册表中的数据。也就是不会注销任何微服务,因为可能会因为网络原因导致心跳数据丢失等情况。
.
Eureka 客户端配置(单独项目)
- 导入依赖 可以在创建项目时直接选择依赖即可 若没有再去pom.xml文件中添加
<dependency>
	<groupId>org.springframework.cloud</groupId>
	<artifactId>spring-cloud-starter-netflix-eureka-server</artifactId>
</dependency>
- 配置文件
eureka:
  server:
  	# 注册中心清理无效节点信息间隔 默认60000 单位 ms 即 60s
  	eviction-interval-timer-in-ms: 60000
    enable-replicated-request-compression: false # 测试环境下需要频繁启动、停止,所以关闭eureka保护模式
# 注册中心配置 客户端
 instance:
 	# 表示eureka服务器自上一次收到注册服务的心跳超时时间 单位 s 默认90s 当超过这个时间后还是没有收到服务心跳数据则认为服务不可用 可以删除
 	lease-expiration-duration-in-seconds: 90
 	# 心跳数据发送间隔 单位 s 向注册中心发送自己的心跳证明自己服务可用
   lease-renewal-interval-in-seconds: 30 # 默认配置
 	# 服务名 唯一
   hostname: eurekaA
# 微服务端 服务提供者
 client:
    register-with-eureka: true# 是否向其他eureka注册 没有erueka集群时需要关闭 默认开启
    fetch-registry: true       # 是否拉取其他eureka注册中心注册表信息 没有erueka集群时需要关闭 默认开启
    # 向其他eureka注册中心拉取微服务注册信息间隔 单位s
    registry-fetch-interval-seconds: 30
    # 向其他 eureka 注册中心注册自身
    service-url:
    # defaultZone: 默认时区 若为云实例时 可设置为云服务商提供的时区 例如 beiJing shangHai shenZhen 等
    	defaultZone: http://127.0.0.1:2002/eureka,http://127.0.0.1:2003/eureka
- Java文件配置
在启动类上加入注解:@EnableEurekaServer
//Eureka 注解 启用 eureka 客户端
@EnableEurekaServer
@SpringBootApplication
public class SpringBootRun {
	public static void main(String[] args) {
		SpringApplication.run(SpringBootRun .class, args);
	}
}
Eureka微服务端配置
- 添加依赖
<dependency>
	<groupId>org.springframework.cloud</groupId>
	<artifactId>spring-cloud-starter-netflix-eureka-client</artifactId>
</dependency>
- yml配置
eureka:
# 微服务端 服务提供者
   client:
     register-with-eureka: true # 是否向其他eureka注册 没有erueka集群时需要关闭 默认开启
     fetch-registry: true       # 是否拉取其他eureka注册中心注册表信息 没有erueka集群时需要关闭 默认开启
     # 向eureka注册中心拉取微服务注册信息间隔 单位s
     registry-fetch-interval-seconds: 30

     # 一般只需配置到下面内容即可 上面也是默认配置 写不写都一样 只是列举了常用配置
     # 向 eureka 注册中心注册
     service-url:
     # defaultZone: 默认时区 若为云实例时 可设置为云服务商提供的时区例如 beiJing shangHai shenZhen 等
     	# http://域名||ip/eureka,....多个
     	defaultZone: http://127.0.0.1:2001/eureka,http://127.0.0.1:2002/eureka,http://127.0.0.1:2003/eureka
- Java配置
启动类添加注解@EurekaDiscoveryClient
//Eureka 注解 启用发现 eureka 客户端
@EurekaDiscoveryClient
@SpringBootApplication
public class SpringBootRun {
	public static void main(String[] args) {
		SpringApplication.run(SpringBootRun .class, args);
	}
}
- 访问 Eureka 客户端查看注册信息是否完整

Eureka 和 zookeeper区别
- eureka特点:
- AP 结构 注重可用性
- 集群:对等结构 每一个都可以理解为为主机 相互注册自身信息 相互拉取注册表信息
- zookeeper特点:
- CP 结构 注重一致性
- 集群: 主从结构 一个主机有多个从机 从机同步主机数据
微服务调用工具
RestTemplate
- RestTemplate 介绍:
String Boot提供的工具,类似 HttpClient, Jsoup,是一个http远程连接,远程调用工具 - 特点:
不用繁杂的配置,功能比较单一,简单易用。 - 常用方法:
l getForObject(url, 转换的类型, 提交的参数)
l postForObject(url, 提交的数据, 转换的类型) - 使用:
写一个返回值为RestTemplate的方法 交给Spring容器管理,调用时@Autowired注入即可,需要指定名称注入时可以联合使用Spring注解@Auotwired+@Qualifier("具体接口实现类")或者@Resource
Ribbon
配置&使用
- hystrix 起步依赖(可选)
- ribbon 起步依赖已经包含在了eureka依赖中可以不用添加
<dependency>
	<groupId>org.springframework.cloud</groupId>
	<artifactId>spring-cloud-starter-netflix-ribbon</artifactId>
</dependency>
主要功能:负载均衡和重试
负载均衡
- 需要在交由Spring容器管理的RestTemmplate方法上标明注解
@LoadBalanced
@LoadBalanced //负载均衡注解
@Bean
public RestTemplate getRestTemplate() {
	return new RestTemplate();
}
- 使用RestTemmplate调用微服务时访问域名不要填写真实域名使用 微服务服务名 即 yml文件中配置的 spring.application.name: 的值
spring:
  application:
    name: user-server
@PostMapping("/item-service/login/{userInfo}")
public JsonResult login(@RequestBody List<User> userInfo) {
	// {1}为占位符
	return rt.postForObject("http://user-server/login/{1}", userInfo, JsonResult.class);
}
重试
在异常、超时等调用异常的情况下执行·
- 添加 retry 依赖
<dependency>
	<groupId>org.springframework.retry</groupId>
	<artifactId>spring-retry</artifactId>
</dependency>
- 配置yml
ribbon:
  MaxAutoRetriesNextServer: 2
  MaxAutoRetries: 1
  OkToRetryOnAllOperations: true
- yml 可能没有提示 有点 emm...
ConnectionTimeout连接超时
ReadTimeout读取资源超时
上面连个参数不能在yml中配置
MaxAutoRetriesNextServer失败后向后请求几台服务器
MaxAutoRetries每台服务器请求失败向后再请求几次
OkToRetryOnAllOperations是否对所有请求都重试
默认false GET请求无论是连接超时还是读取超时,都会进行重试非GET方式请求,只有连接超时时,才会进行重试 慎用 当 POST 或者 PUT 等提交操作时时可能因为网络延时原因导致重试 从而进行了多次的更改数据
- 配置超时
在RestTemplate 交由 bean 管理方法中添加 SimpleClientHttpRequestFactory 工厂对象进行构建
@LoadBalanced //启用负载均衡 ribbon 对RestTemplate进行了增强AOP增加了 负载均衡和重试策略
@Bean
public RestTemplate restTemplate() {
	/*设置超时时间*/
	SimpleClientHttpRequestFactory factory = new SimpleClientHttpRequestFactory();
	factory.setConnectTimeout(300); //设置建立连接超时时间 ms
    factory.setReadTimeout(300);    //设置建立连接到读取到资源的超时时间 ms
    /*将超时时间配置存入RestTemplate中*/
    return new RestTemplate(factory);
}
- ribbon的重试机制,在 feign 和 zuul 中进一步进行了封装,后续可以使用feign或zuul的重试机制
Hystrix 断路器
降级和熔断
配置&使用
- hystrix 起步依赖
<dependency>
	<groupId>org.springframework.cloud</groupId>
	<artifactId>spring-cloud-starter-netflix-hystrix</artifactId>
</dependency>
<!-- 如果没有@HystrixCommand 注解加此依赖 -->
<dependency>
    <groupId>com.netflix.hystrix</groupId>
    <artifactId>hystrix-javanica</artifactId>
    <version>RELEASE</version>
</dependency>
- 主程序添加
@EnableCircuitBreaker注解启用 hystrix 断路器
//@EnableCircuitBreaker // 启用断路器
//@EnableDiscoveryClient // 启用发现 eureka 客户端
//@SpringBootApplication // SpringBoot启动注解
//以上三个注解可以简化为 SpringCloudApplication
@SpringCloudApplication
public class SpringBootRun{

	@LoadBalanced // ribbon 负载均衡
	@Bean
	public RestTemplate getRestTemplate() {
		SimpleClientHttpRequestFactory f = new SimpleClientHttpRequestFactory();
		f.setConnectTimeout(1000);
		f.setReadTimeout(1000);
		return new RestTemplate(f);

		//RestTemplate 中默认的 Factory 实例中,两个超时属性默认是 -1,
		//未启用超时,也不会触发重试
		//return new RestTemplate();
	}
	public static void main(String[] args) {
		SpringApplication.run(SpringBootRun.class, args);
	}
}
降级
当后台服务不可用、执行超时,或执行失败后执行降级方法(备用方法)来向客户端返回结果
在需要降级的方法·上添加 @HystrixCommand(fallbackMethod = "降级方法()")
/*主方法*/
@HystrixCommand(fallbackMethod = "loginFB")
@PostMapping("/item-service/login/{userInfo}")
public JsonResult login(@RequestBody List<User> userInfo) {
	// {1}为占位符
	return rt.postForObject("http://user-server/login/{1}", userInfo, JsonResult.class);
}
/*降级方法*/
public JsonResult loginFB(List<User> userInfo) {
	return JsonResult.err("抱歉,服务器正忙!");
}
熔断
1.在 10s 内 20 次请求 并且有 50% 的请求失败执行了降级 则触发熔断 后续请求不再请求服务提供者的服务器 直接执行降级方法
2.熔断的 5s 后熔断处于半开状态 会尝试性的去请求 如果请求成功 则断路器关闭 请求不成功 断路器继续保持熔断状态
Hystrix的逻辑,先判断是否满足第一个条件,再判断第二个条件,如果两个条件都满足,则会开启断路器
Hystrix常用 yml 配置参数
hystrix.command.default.execution.isolation.thread.timeoutInMilliseconds
请求超时时间,超时后触发失败降级 默认1000ms
hystrix.command.default.circuitBreaker.requestVolumeThreshold
10秒内请求数量,默认20,如果没有达到该数量,即使请求全部失败,也不会触发断路器打开
hystrix.command.default.circuitBreaker.errorThresholdPercentage
失败请求百分比,达到该比例则触发断路器打开 默认50%
hystrix.command.default.circuitBreaker.sleepWindowInMilliseconds
断路器打开多长时间后,再次允许尝试访问(半开),仍失败则继续保持打开状态,如成功访问则关闭断路器,默认 5000ms
hystrix:
  command:
    default:
      execution:
        isolation:
          thread:
            # 请求超时后降级 默认 1s 单位 ms
            timeoutInMillisecond: 1000
      circuitBreaker:
        # 熔断后多久允许半开 尝试访问 默认 5s 单位 ms
        sleepWindowInMilliseconds: 5000
        # 失败请求百分比 默认 50%
        errorThresholdPercentage: 50
        # 10s 请求数量 默认20
        requestVolumeThreshold: 20
- 需要进行监控的项目添加actuator依赖 和 hystrix 依赖
actuator 是SpringBoot 中的依赖 主要用于健康检查、统计等等
<dependency>
  <groupId>org.springframework.cloud</groupId>
  <artifactId>spring-cloud-starter-netflix-hystrix</artifactId>
</dependency>

<dependency>
	<groupId>org.springframework.boot</groupId>
	<artifactId>spring-boot-starter-actuator</artifactId>
</dependency>
<!-- 如果没有hystrix.stream 端口添加下面的依赖-->
<dependency>
		<groupId>com.netflix.hystrix</groupId>
		<artifactId>hystrix-metrics-event-stream</artifactId>
</dependency>
- 添加yml配置 暴露监控端点
hystrix.stream暴露所有*
management:
  endpoints:
    web:
      exposure:
        include: hystrix.stream
- 监控端点是hystrix的监控信息,只会监控
@HystrixCommand或者@FeignClient - 启用启动类 启用
发现注册中心和Hystrix @EnableDiscoveryClient或者@EnableEurekaClient因为SpringCloud 支持多种注册中心 前者启用多种都可以 后者仅启用Eureka@EnableHystrix中包含了@EnableCircuitBreaker都可以启用 hystrix
@EnableHystrix
@SpringBootApplication
public class FeignApplication {
    public static void main(String[] args) {
        SpringApplication.run(FeignApplication.class, args);
    }
}
hystrix 监控面板 HystrixDashboard
- 监控面板为单独项目 只需新建单独项目 添加eureka微服务端依赖 注解启用 发现客户端
- 添加依赖
<!-- 仪表盘依赖 -->
<dependency>
	<groupId>org.springframework.cloud</groupId>
	<artifactId>spring-cloud-starter-netflix-hystrix-dashboard</artifactId>
</dependency>
<!-- eureka发现客户端依赖 -->
<dependency>
	<groupId>org.springframework.cloud</groupId>
	<artifactId>spring-cloud-starter-netflix-eureka-client</artifactId>
</dependency>
- yml 配置
spring:
  application:
    name: hystrix-dashboard
server:
  port: 4001
eureka:
  client:
    service-url:
      defaultZone: http://127.0.0.1:2001/eureka, http://127.0.0.1:2002/eureka
- 添加启动注解
@EnableHystrixDashboard // 启用Hystrix仪表板
@EnableDiscoveryClient  // 启用发现客户端
@SpringBootApplication
public class Sp08HystrixDashboardApplication {
	public static void main(String[] args) {
		SpringApplication.run(Sp08HystrixDashboardApplication.class, args);
	}
}
-
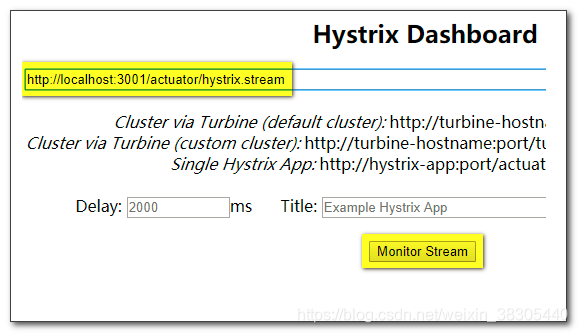
访问 hystrix dashboard
地址:http://XXX/hystrix

-
填入 hystrix 的监控端点,开启监控
地址:http://XXX/actuator/hystrix.stream需要进行监控的项目地址+健康检查地址
-
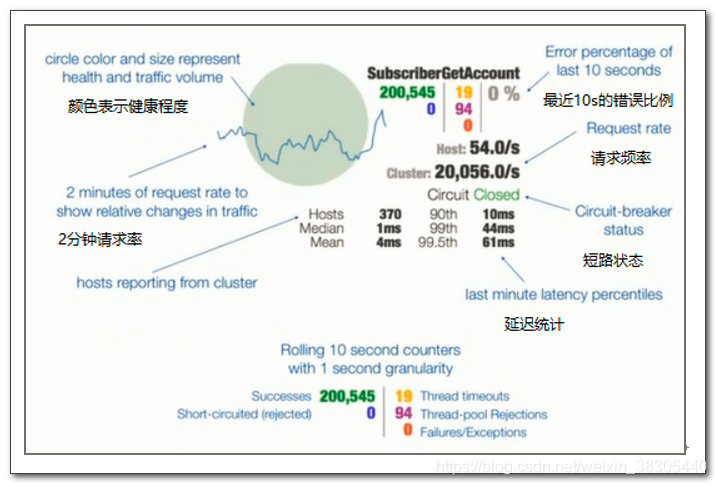
监控信息

Feign
微服务应用中,ribbon 和 hystrix 总是同时出现,feign 整合了两者,并提供了声明式消费者客户端
配置&使用
- hystrix 起步依赖
<dependency>
	<groupId>org.springframework.cloud</groupId>
	<artifactId>spring-cloud-starter-openfeign</artifactId>
</dependency>
- 在启动类上加
@EnableFeignClients
// 启用Feign客户端
@EnableFeignClients
// 启用发现eureka服务
@EnableDiscoveryClient
@SpringBootApplication
public class SpringBootRun {

	public static void main(String[] args) {
		SpringApplication.run(SpringBootRun .class, args);
	}
}
feign 声明式客户端
feign 利用了我们熟悉的 spring mvc 注解来对接口方法进行设置,降低了我们的学习成本。
通过这些设置,feign可以拼接后台服务的访问路径和提交的参数
@FeignClient(name = "用户微服务") 标记在接口上 具体的访问路径和参数与Controller层使用方法一致
例如:
@GetMapping("/{userId}/score")
JsonResult addScore(@PathVariable Integer userId, @RequestParam Integer score);
当这样调用该方法:
service.addScore(7, 100);
那么 feign 会向服务器发送请求:
http://用户微服务/7/score?score=100
- 注意:如果 score 参数名与变量名不同,需要添加参数名设置:
@GetMapping("/{userId}/score")
JsonResult addScore(@PathVariable Integer userId, @RequestParam("score") Integer s);
- 声明式客户端 接口
//声明访问的路径 路径为服务提供者的spring.application.name
//声明降级类 降级类需要实现此接口 然后交给spring管理 当服务器响应超时时会直接去访问 实现接口的对应方法
@FeignClient(name = "item-service",fallback = ItemServiceFallBack.class)
public interface ItemService {
	//具体的访问路径 使用的是spring注解 将调用方法传入时的参数通过反射机制拿到 orderId值再赋值给注解 然后拼接类注解值得到具体路径
	@GetMapping("/{orderId}")
	JsonResult<List<Item>> getItems(@PathVariable String orderId);

	//@RequestBody 注解是将传过来的json解析为对象再赋值
	@PostMapping("/decreaseNumber")
	JsonResult decreaseNumber(@RequestBody List<Item> items);
}
feign + ribbon 负载均衡和重试
无需额外配置,feign 默认已启用了 ribbon 负载均衡和重试机制。可以通过配置对参数进行调整
- application.yml 配置 ribbon 超时和重试
ribbon.xxx 全局配置item-service.ribbon.xxx 对特定服务实例的配置
# 全局配置
ribbon:
  # 建立连接超时时间
  ConnectTimeout: 1000
  # 读取到资源超时时间
  ReadTimeout: 1000
# 只针对于请求指定微服务时
item-service:
  ribbon:
    ConnectTimeout: 500
    ReadTimeout: 1000
    # 请求失败后最大向后请求实例
    MaxAutoRetriesNextServer: 2
    # 请求失败后每个实例最多重试次数
    MaxAutoRetries: 1
feign + hystrix 降级
- feign 默认没有启用 hystrix 需要 yml 配置启用
feign:
  hystrix:
    enabled: true # 启用 hystrix
降级实现:继承声明式客户端接口 降级会找指定的实现方法 实现类必须要要用 @Component 交由Spring容器 管理- 接口
//声明访问的路径 路径为服务提供者的spring.application.name
//声明降级类 降级类需要实现此接口 然后交给spring管理 当服务器响应超时时会直接去访问 实现接口的对应方法
@FeignClient(name = "item-service",fallback = ItemServiceFallBack.class)
public interface ItemService {
	//具体的访问路径 使用的是spring注解 将调用方法传入时的参数通过反射机制拿到 orderId值再赋值给注解 然后拼接类注解值得到具体路径
	@GetMapping("/{orderId}")
	JsonResult<List<Item>> getItems(@PathVariable String orderId);

	//@RequestBody 注解是将传过来的json解析为对象再赋值
	@PostMapping("/decreaseNumber")
	JsonResult decreaseNumber(@RequestBody List<Item> items);
}
- 实现类
具体的实现类就是降级类 实现方法就是对应的降级方法
package com.tedu.sp09.service.fallback;

import java.util.List;

import org.springframework.stereotype.Component;

import com.tedu.sp01.pojo.Item;
import com.tedu.sp09.service.ItemService;
import com.tedu.web.util.JsonResult;
@Component
public class ItemServiceFallBack implements ItemService {

	@Override
	public JsonResult<List<Item>> getItems(String orderId) {
		// TODO Auto-generated method stub
		return JsonResult.err("服务器正忙!");
	}

	@Override
	public JsonResult decreaseNumber(List<Item> items) {
		// TODO Auto-generated method stub
		return JsonResult.err("服务器正忙!");
	}

}
feign + hystrix 监控和熔断(断路器)
feign 虽然整合了 ribbon 和 hystrix 但是并不包含hystrix 完整依赖 若要启用监控和熔断仍需添加 hystrix 完整依赖- 添加依赖
<dependency>
	<groupId>org.springframework.cloud</groupId>
	<artifactId>
		spring-cloud-starter-netflix-hystrix
	</artifactId>
</dependency>
- 启动类添加注解
@EnableCircuitBreaker启用 hystrix 断路器
@EnableFeignClients     //启用feign客户端
//@EnableCircuitBreaker   //启用断路器
//@EnableDiscoveryClient  //启用发现客户端(eureka)
//@SpringBootApplication
@SpringCloudApplication  //代替上面三个注解可以
public class SpringBootRun {
	public static void main(String[] args) {
		SpringApplication.run(SpringBootRun.class, args);
	}
}
- 确认
actuator健康检查依赖
<dependency>
	<groupId>org.springframework.boot</groupId>
	<artifactId>spring-boot-starter-actuator</artifactId>
</dependency>
- 暴露
hystrix.stream监控端点
management:
  endpoints:
    web:
      exposure:
        include: hystrix.stream
- 启动
hystrix dashboard仪表盘项目 - 访问
http://XXX/hystrix - 填入需要进行监控的项目
http://XXX/actuator/hystrix.stream - 访问微服务 查看监控数据
- 测试断路器
使用Apache 的 ab 工具进行压力测试 以并发50,来发送20000个请求
ab -n 20000 -c 50 http://localhost:3001/item-service/35
- 断路器状态为 Open,所有请求会被短路,直接降级执行 fallback 方法

Hystrix常用 yml 配置参数
hystrix.command.default.execution.isolation.thread.timeoutInMilliseconds
请求超时时间,超时后触发失败降级 默认1000ms
hystrix.command.default.circuitBreaker.requestVolumeThreshold
10秒内请求数量,默认20,如果没有达到该数量,即使请求全部失败,也不会触发断路器打开
hystrix.command.default.circuitBreaker.errorThresholdPercentage
失败请求百分比,达到该比例则触发断路器打开 默认50%
hystrix.command.default.circuitBreaker.sleepWindowInMilliseconds
断路器打开多长时间后,再次允许尝试访问(半开),仍失败则继续保持打开状态,如成功访问则关闭断路器,默认 5000ms
hystrix:
  command:
    default:
      execution:
        isolation:
          thread:
            # 请求超时后降级 默认 1s 单位 ms
            timeoutInMillisecond:
      circuitBreaker:
        # 熔断后多久允许半开 尝试访问 默认 5s 单位 ms
        sleepWindowInMilliseconds: 5000
        # 失败请求百分比 默认 50%
        errorThresholdPercentage: 50
        # 10s 请求数量 默认20
        requestVolumeThreshold: 20
hystrix + turbine 集群聚合监控
hystrix dashboard 一次只能监控一个服务实例,使用 turbine 可以汇集监控信息,将聚合后的信息提供给 hystrix dashboard 来集中展示和监控
- 新建 turbine 并添加依赖
<!-- turbine依赖 -->
<dependency>
	<groupId>org.springframework.cloud</groupId>
	<artifactId>spring-cloud-starter-netflix-turbine</artifactId>
</dependency>
<!-- eureka发现客户端依赖 -->
<dependency>
	<groupId>org.springframework.cloud</groupId>
	<artifactId>spring-cloud-starter-netflix-eureka-client</artifactId>
</dependency>
- 启动类配置启用依赖注解
@EnableDiscoveryClient  //启用发现eureka客户端
@EnableTurbine  //启用turbine
@SpringBootApplication
public class TurbineApplication {
	public static void main(String[] args) {
		SpringApplication.run(TurbineApplication.class, args);
	}
}
- yml配置
spring:
  application:
    name: turbine
server:
  port: 5001
eureka:
  client:
    service-url:
      defaultZone: http:127.0.0.1:2001/eureka,http://127.0.0.1:2002/eureka
# turbine 配置
turbine:
  aggregator:
    # 指定聚合哪些集群,多个使用","分割,默认为default。
    cluster-config: default
  # 配置 需要聚合信息的 服务名
  app-config: order-server, feign-server
  # 需要聚合的集群的名字
  cluster-name-expression: new String("default")
- 启动项目访问测试
- turbine 监控路径
http://XXX/turbine.stream - hystrix dashboard 监控面板路径
http://XXX/hystrix - 在 hystrix dashboard 监控面板中填入 turbine 监控路径

- 进行访问微服务产生监控信息 再返回监控面板查看有误信息 信息是否完整

Zuul
- zuul API 网关,为微服务应用提供统一的对外访问接口。
- zuul 还提供过滤器,对所有微服务提供统一的请求校验。
Zuul API 网关
- 依赖
<dependency>
	<groupId>org.springframework.cloud</groupId>
	<artifactId>spring-cloud-starter-netflix-zuul</artifactId>
</dependency>
- yml配置
zuul 自身也需要注册到注册中心 也会对从注册中心拉取数据 如果微服务名与期望的访问路径一致 此配置时缺省的
zuul:
  routes:
  	# 微服务名     映射路径
    item-service: /item-service/**
    user-service: /user-service/**
    order-service: /order-service/**
- 启动类添加注解
@EnableZuulProxy它是@EnableZuulServer的增强版
@EnableZuulProxy   //启用Zuul服务端 spring基于 @EnableZuulServer的增强
@EnableDiscoveryClient  //启用发现eureka注册中心客户端
@SpringBootApplication
public class ZuulApplication {
	public static void main(String[] args) {
		SpringApplication.run(ZuulApplication.class, args);
	}
}
访问路径为:http://zuul地址/映射路径
Zuul + Ribbon 负载均衡
zuul 已经集成了 ribbon,默认已经实现了负载均衡
Zuul+Ribbon 重试
- 添加依赖
retry依赖
<dependency>
	<groupId>org.springframework.retry</groupId>
	<artifactId>spring-retry</artifactId>
</dependency>
- 配置zuul开启重试 并配置ribbon超时重试参数
# 开启重试
zuul:
  retryable: true
#  # 映射路径  可以是缺省值
#  routes:
#    item-service: /item-service/**
#    user-service: /user-service/**
#    order-service: /order-service/**

# 重试参数
ribbon:
  ConnectTimeout: 1000
  ReadTimeout: 1000
  MaxAutoRetriesNextServer: 1
  MaxAutoRetries: 1
zuul + Hystrix 降级 和 熔断
- 熔断参考上文中的
Hystrix 熔断的配置配置即可 降级类需要实现接口FallbackProvider
getRoute()方法中指定应用此降级类的服务id,星号或null值可以通配所有服务- 降级类示例代码
// log4j
@Slf4j
// 交由spring管理
@Component
public class ItemServiceFallback implements FallbackProvider {
	@Override
	public String getRoute() {
	    //当执行item-service失败,
	    //应用当前这个降级类

	    //星号和null都表示所有微服务失败都应用当前降级类
		//"*"; //null;
		return "item-service";
	}

    //该方法返回封装降级响应的对象
    //ClientHttpResponse中封装降级响应
	@Override
	public ClientHttpResponse fallbackResponse(String route, Throwable cause) {
        return response();
	}

	private ClientHttpResponse response() {
        return new ClientHttpResponse() {
            //下面三个方法都是协议号
            //获取http响应状态代码
            @Override
            public HttpStatus getStatusCode() throws IOException {
                return HttpStatus.OK;
            }
            //获取http状态代码
            @Override
            public int getRawStatusCode() throws IOException {
                return HttpStatus.OK.value();
            }
            //获取http响应相应报文
            @Override
            public String getStatusText() throws IOException {
                return HttpStatus.OK.getReasonPhrase();
            }
			// 关闭方法一般不用谢任何代码
            @Override
            public void close() {
            }
			//http响应体
            @Override
            public InputStream getBody() throws IOException {
            	log.info("fallback body");
            	String s = JsonResult.err().msg("后台服务错误").toString();
                return new ByteArrayInputStream(s.getBytes("UTF-8"));
            }
			// 设置响应头信息
            @Override
            public HttpHeaders getHeaders() {
                HttpHeaders headers = new HttpHeaders();
                headers.setContentType(MediaType.APPLICATION_JSON);
                return headers;
            }
        };
    }
}
- 配置文件
# 启用重试
zuul:
  retryable: true
# 重试参数
ribbon:
  ConnectTimeout: 1000
  ReadTimeout: 2000
  MaxAutoRetriesNextServer: 1
  MaxAutoRetries: 1

# 超时时间 一般来说应该比 重试的总耗时长一点 这样等待重试都完成后进行降级
hystrix:
  command:
    default:
      execution:
        isolation:
          thread:
            timeoutInMilliseconds: 1000
Zuul 的请求过滤
zuul 请求过滤需要继承 ZuulFilter 类 无需进行多余配置 只需将过滤类交给Spring容器管理即可
shouldFilter()方法判断需要进行过滤的请求 返回值为true时表示需要进行过滤执行run()方法false则不进行过滤直接执行业务调用run()方法中进行过滤操作 例如是否允许登录等等filterType()方法指定需要在那个过滤器中进行过滤 例如FilterConstants.PRE_TYPE前置过滤器 大部分为前置过滤器filterOrder()过滤器执行顺序 数字越小等级越高
示例: 当URl请求中没有token参数返回未登陆 当然token在不应该在url中直接进行明文传输 这里只做演示
@Component
public class TokenFilter extends ZuulFilter {

	/**
	   *  判断是否执行过滤器
	 */
	@Override
	public boolean shouldFilter() {
		// TODO Auto-generated method stub
		// 获取请求上下文
		RequestContext currentContext = RequestContext.getCurrentContext();
		// 从请求上下文中获取 serviceId
		Object serviceId = currentContext.get(FilterConstants.SERVICE_ID_KEY);
		// 当是需要过滤的id时执行过滤器
		if (serviceId.equals("item-service")) {
			return true;
		}
		//否则返回 false
		return false;
	}
	/**
	    *  过滤器
	 */
	@Override
	public Object run() throws ZuulException {
		// TODO Auto-generated method stub
		// 获取当前请求上下文
		RequestContext currentContext = RequestContext.getCurrentContext();
		// 获取request 对象
		HttpServletRequest request = currentContext.getRequest();
		// 从request域中取值
		String token = request.getParameter("token");
		//判断值是否为空 空:true
		if (token==null||token.length()==0) {
			//阻止执行,直接向客户端返回结果
			currentContext.setSendZuulResponse(false);
			//设置response响应状态
			currentContext.setResponseStatusCode(200);
			//通过全局json响应进行封装
			currentContext.setResponseBody(JsonResult.err("没有登录!").code(JsonResult.NOT_LOGIN).toString());
		}
		// zuul 为了以后升级预留返回值 至今没用
		return null;
	}

	/**
	   *   设置过滤类型 ——> 前置过滤
	 */
	@Override
	public String filterType() {
		// TODO Auto-generated method stub
		return FilterConstants.PRE_TYPE;
	}

	/**
	 *  设置过滤器顺序
	 */
	@Override
	public int filterOrder() {
		// PRE_DECORATION_FILTER_ORDER 属于pre最重要的过滤器,基本的路由转发配置,请求修饰都在这里完成。
		// 他的等级是 5 我们所需要的拿到的 微服务id也在这层过滤去进行装饰 所以我们的等级要比他低 +1
		// 等级:6
		return FilterConstants.PRE_DECORATION_FILTER_ORDER+1;
	}
}
PRE_DECORATION_FILTER_ORDER 属于pre最重要的过滤器,基本的路由转发配置,请求修饰都在这里完成,他的等级是 5 我们所需要的拿到的 微服务id也在这层过滤去进行装饰 所以我们的等级要比他低 所及进行了 +1 也就是等级为 6
一般来说不会让 Zuul实现太多功能 例如重试、降级、熔断 交由微服务自己独立完成即可 Zuul也可以搭建集群那就需要用 Nginx 或者其他工具、硬件等 进行反向代理、负载均衡
Config 配置中心
- yml 配置文件保存到 git 服务器,例如
github.com或gitee.com微服务启动时,从服务器获取配置文件。 config 服务器启动时下载 配置文件 微服务启动时从 config服务器 获取配置文件从config 配置中心获取的 配置文件 比 application.yml 优先级高 当两个配置冲突时 优先使用 配置中心获取的文件
config 服务端
- 添加依赖
<!-- config-server 服务端依赖 -->
<dependency>
	<groupId>org.springframework.cloud</groupId>
	<artifactId>spring-cloud-config-server</artifactId>
</dependency>
<!-- eureka 微服务端依赖 -->
<dependency>
	<groupId>org.springframework.cloud</groupId>
	<artifactId>spring-cloud-starter-netflix-eureka-client</artifactId>
</dependency>
- 配置文件
配置文件推荐存放位置 Git 服务器
放在本地时必须配置 spring.profiles.active=native 来激活本地文件系统
spring:
  # 服务 id
  application:
    name: config-server
  # 启用本地存放配置文件
  #profiles:
    #active: native
  cloud:
    config:
      server:
      	# 配置存放在本地
        #native:
          # 路径 resource 文件夹下
          #search-locations: classpath:/config
        # 配置存放在 git 服务器 官方推荐
        git:
          uri: 配置文件仓库路径
          searchPaths: config
          # 当时私有仓库时需要 用户名密码
          #username: 用户名
          #password: 密码
          #basedir: #通过basedir指定本地分支存放的文件夹
  # 配置连接信息
  rabbitmq:
  	# 地址
    host: 192.168.64.140
    # 端口
    port: 5672
    username: admin
    password: admin

server:
  port: 6001
# 向 eureka 服务器注册
eureka:
  client:
    service-url:
      defaultZone: http://eureka1:2001/eureka, http://eureka2:2002/eureka
management:
  endpoints:
    web:
      exposure:
        include: bus-refresh
- 启动类标识注解 启用服务
- 启用config配置中心服务
@EnableConfigServer - 启用发现客户端
@EnableDiscoveryClient
@EnableConfigServer
@EnableDiscoveryClient
@SpringBootApplication
public class ConfigApplication {
	public static void main(String[] args) {
		SpringApplication.run(ConfigApplication.class, args);
	}
}
config 客户端
- 添加客户端依赖
<dependency>
	<groupId>org.springframework.cloud</groupId>
	<artifactId>spring-cloud-starter-config</artifactId>
</dependency>
- 配置文件
添加 bootstrap.yml 文件 bootstrap 文件加载比 application 早
编辑bootstrap.yml文件
spring:
  cloud:
    config:
      discovery:
        enabled: true
        # 配置中心服务器 id
        service-id: config-server
      # 需要拉取的文件名
      name: item-server
      # 环境名 例如 item-server-dev.yml
      profile: dev

eureka:
  client:
    service-url:
      defaultZone: http://eureka1:2001/eureka, http://eureka2:2002/eureka
- 官方推荐 git 中的配置文件名以
文件名-环境名.后缀名来命名 - 开发环境:
dev - 测试环境:
test - 生产环境:
prod
动态刷新配置文件
-
访问端点手动刷新服务器配置文件
只能刷新单个服务
http://域名/actuator/refresh -
一般只能刷新
自定义的配置 例如服务端口号等 无法刷新 -
只允许对添加了
@RefreshScope或@ConfigurationProperties注解的Bean中的对象刷新配置,可以将更新的配置数据注入到 Bean 中 -
添加依赖 健康检查
<dependency>
	<groupId>org.springframework.boot</groupId>
	<artifactId>spring-boot-starter-actuator</artifactId>
</dependency>=
- 配置文件 暴露端口、自定义配置等
例如: 新的配置修改了自定义配置 但是服务器在启动状态
# 自定义配置
user:
  userInfo: "[{\"id\":1,\"nickname\":\"祈风\", \"username\":\"root\",\"password\":\"root\"}]"
# spring 配置
spring:
  cloud:
    config:
      discovery:
        enabled: true
        # 配置中心服务器 id
        service-id: config-server
      # 需要拉取的文件名
      name: user-server
      # 环境名 例如 item-server-dev.yml
      profile: dev
# 向注册中心注册
eureka:
  client:
    service-url:
      defaultZone: http://eureka1:2001/eureka, http://eureka2:2002/eureka
# 健康检查 暴露监控端点
management:
  endpoints:
    web:
      exposure:
        include: refresh
Java 文件
@RefreshScope
@RestController
@RequestMapping("/user")
public class UserInfo{
	// 重新获取配置文件时 动态刷新值 重新注入
	@Value("${user.userInfo}")
	private User userInfo;
	@GetMapping("/getUserInfo")
	public String getUserInfo(){
		return userInfo;
	}
}
Bus
Bus + RabbitMQ 消息总线配置刷新
post 请求消息总线刷新端点,服务器会向 rabbitmq 发送刷新指令,rabbitmq 将刷新指令发送给微服务,接收到消息的微服务会向配置服务器请求刷新配置信息
安装 RabbitMQ
在centos7上安装rabbitmq
- 安装erlang语言库
RabbitMQ使用了Erlang开发语言,Erlang是为电话交换机开发的语言,天生自带高并发光环,和高可用特性
下载&安装# 下载 wget https://github.com/rabbitmq/erlang-rpm/releases/download/v21.2.6/erlang-21.2.6-1.el7.x86_64.rpm # 安装 rpm -ivh erlang-21.2.6-1.el7.x86_64.rpm --force --nodeps - 安装socat依赖
# 下载 socat rpm wget http://mirror.centos.org/centos/7/os/x86_64/Packages/socat-1.7.3.2-2.el7.x86_64.rpm # 安装 socat 依赖包 rpm -ivh socat-1.7.3.2-2.el7.x86_64.rpm - 安装rabbitmq
# 下载 rpm 包 wget https://github.com/rabbitmq/rabbitmq-server/releases/download/v3.7.13/rabbitmq-server-3.7.13-1.el7.noarch.rpm # 安装 rpm 包 rpm -ivh rabbitmq-server-3.7.13-1.el7.noarch.rpm - rabbitmq 开机启动&启动&停止
# 设置服务,开机自动启动 chkconfig rabbitmq-server on # 启动服务 service rabbitmq-server start # 停止服务 service rabbitmq-server stop - 启用UI管理界面
# 开启管理界面插件 rabbitmq-plugins enable rabbitmq_management # 防火墙打开 15672 管理端口 firewall-cmd --zone=public --add-port=15672/tcp --permanent firewall-cmd --reload访问:http://XXX:15672登录 分配权限 - 添加用户 并赋予权限
账号:admin密码:admin# 添加用户 rabbitmqctl add_user admin admin # 新用户设置用户为超级管理员 rabbitmqctl set_user_tags admin administrator - 开放连接端口
	# 打开客户端连接端口
	firewall-cmd --zone=public --add-port=5672/tcp --permanent
	firewall-cmd --reload
添加 bus、rabbitmq 依赖
每个需要刷新配置的微服务都需要进行 添加依赖 添加配置文件
<dependency>
		<groupId>org.springframework.boot</groupId>
		<artifactId>spring-boot-starter-amqp</artifactId>
</dependency>
<dependency>
		<groupId>org.springframework.amqp</groupId>
		<artifactId>spring-rabbit-test</artifactId>
		<scope>test</scope>
</dependency>

<dependency>
		<groupId>org.springframework.cloud</groupId>
		<artifactId>spring-cloud-starter-bus-amqp</artifactId>
</dependency>
配置 RabbitMQ 连接信息 并暴露端点用来刷新配置
暴露刷新端点 只需暴露一个微服务即可 例如: 暴露 ConfigServer 配置中心服务器端点
spring:
  # 服务 id
  application:
    name: config-server

  # 配置连接信息
  rabbitmq:
  	# 地址
    host: 192.168.64.140
    # 端口
    port: 5672
    username: admin
    password: admin

  cloud:
    config:
      server:
        git:
          uri: 配置文件仓库路径
          searchPaths: config
          # 当时私有仓库时需要 用户名密码
          #username: 用户名
          #password: 密码
          #basedir: #通过basedir指定本地分支存放的文件夹

server:
  port: 6001
# 向 eureka 服务器注册
eureka:
  client:
    service-url:
      defaultZone: http://eureka1:2001/eureka, http://eureka2:2002/eureka
management:
  endpoints:
    web:
      exposure:
        include: bus-refresh
POST访问 http://XXX/actuator/bus-refresh 即可刷新全部微服务配置
POST访问 http://XXX/actuator/bus-refresh/XXX 即可刷新指定微服务配置
Sleuth 链路跟踪
sleuth 可以收集调用的链路信息
- 在需要进行跟踪的微服务添加依赖
<!-- sleuth 依赖 -->
<dependency>
	<groupId>org.springframework.cloud</groupId>
	<artifactId>spring-cloud-starter-sleuth</artifactId>
</dependency>
<!-- zipkin 依赖 -->
<dependency>
    <groupId>org.springframework.cloud</groupId>
    <artifactId>spring-cloud-starter-zipkin</artifactId>
</dependency>
- 访问服务并查看控制台
[服务id,请求id,span id,是否发送到zipkin]

- 链路数据默认只有10%发送到Zipkin
- 可以修改发送数据量
spring:
  sleuth:
    sampler:
      # 发送 10%
      probability: 0.1
Sleuth + Zipkin 链路分析
zipkin 下载
https://github.com/openzipkin/zipkin

- 启动 zipkin 并连接到 rabbitmq
java -jar zipkin-server.jar --zipkin.collector.rabbitmq.uri=amqp://账号:密码@rabbitmq 地址
例如:java -jar zipkin-server-2.12.9-exec.jar --zipkin.collector.rabbitmq.uri=amqp://admin:admin@192.168.64.140:5672 - 访问zipkin
http://XXX/zipkin

